TL;DR
SageMaker を使って素人が見よう見まねで機械学習してみた結果、散々な結果に終わった。
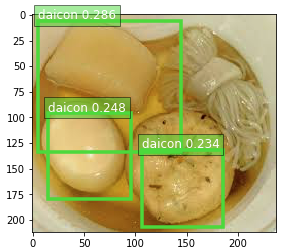
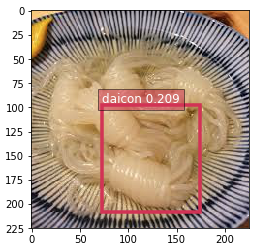
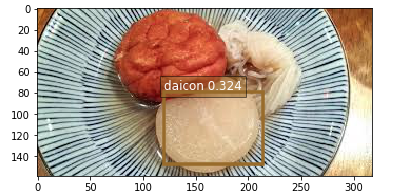
大根・しらたき・がんもどきを学習させたのに大根しか出ねぇ……
(図示するしきい値をゆるくすると大根以外も検出されてたので、一応、バグの類ではない模様)
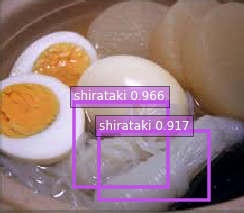
ちなみに、しらたきだけ学習させたときはいい感じだったので、しらたき検出器だけで良いのであれば実用的かもしれない。
SageMaker とは
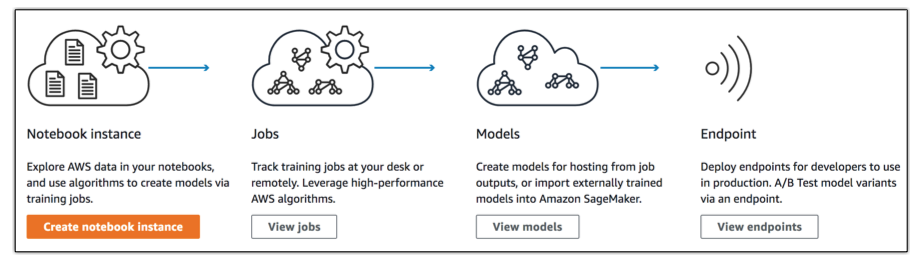
だれでも機械学習ができる環境を御膳立してくれるすごいサービス。
具体的には、下記の要素を提供しているらしい。
- Jupyter Notebook 用インスタンス
- 頭いい人たちがよく使ってる Web GUI な Python 実行環境
- トレーニング用データの前処理 (Data Wrangling) 等を行う
- AWS によるサンプルノートブックがたくさんある
- モデルトレーニングジョブの実行環境
- トレーニングジョブをぶん回す環境
- スケールアップ・スケールアウトも簡単にできる
- モデルホスティング
- 構築したモデルを使って推論をおこなうエンドポイントをデプロイ・ホスティング
あとは己にイカした脳みそが搭載されていれば、面倒くさい環境構築などをすっ飛ばしていい感じに機械学習に取り掛かれる。
SageMaker (の組み込みアルゴリズム) でできること
- 物体検出
- 画像分類
- 文書のトピックモデリング
- その他いくつか
Apache MXNet や TensorFlow といった有名な機械学習用フレームワークも使用できるが、
初心者はとりあえず SageMaker の組み込みアルゴリズムを使えば良いのではないだろうか。
今回は、画像中のおでん種の検出を行うので、物体検出 用のアルゴリズムを使用した。
手順
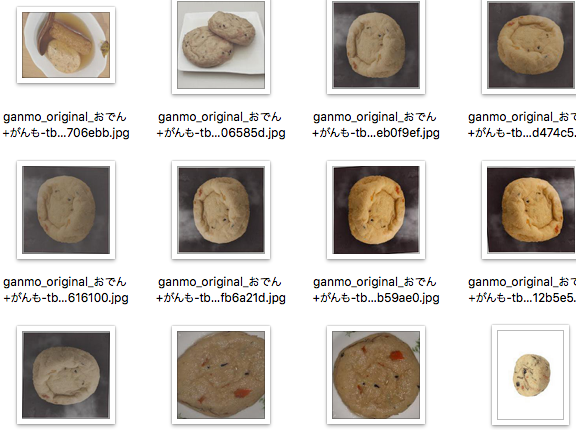
AWS のサンプルノートブック をベースに大根・しらたき・がんもどきのデータセットを独自に用意した。
トレーニング用画像の取得
Google 画像検索の結果ページに表示されるサムネイル画像を拝借した。 拾ってきたままだと、関係ない画像やトレーニング用として不適切そうな画像 (例: 食べかけの大根) が紛れ込んでいるので手動で選別した。
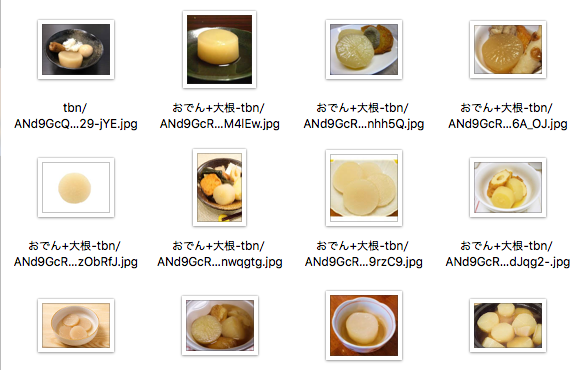
最終的に下記の枚数になった。
| おでん種 | 枚数 |
|---|---|
| 大根 | 64 枚 |
| がんもどき | 34 枚 |
| しらたき | 32 枚 |
画像の水増し (Image Augmentation)
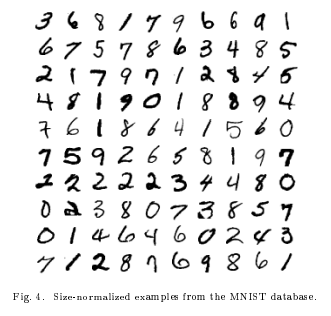
機械学習には大量のトレーニング用データが必要になる。
例として、よく見かける The MNIST database の手書き数字データには 6 万枚のトレーニング用画像が含まれる。
よって、今回は選りすぐりの少ないおでん画像を Augmentor を使って水増しした。
具体的には、下記の加工を施したバリエーションを増やした。
- 上下左右反転
- 回転
- コントラスト変更
- 歪ませる
これにより、大根・がんもどき・しらたき画像がそれぞれ 100 枚ずつとなった。
(これでも少ないが、後述のアノテーション作業がつらいので……)
アノテーション
今回用いた物体検出 は、教師あり学習である。 つまり、先の手順で拾ってきた画像に対して正解データを用意する必要があるんですね。
…………と、このように Microsoft の VoTT (Visual Object Tagging Tool) を用いて、上の動画のような作業を全画像 (300枚) に対しておこなった。
タグ付け後は、クラスメソッドさんの記事にあるスクリプトを使って VoTT が出力した JSON を指定された JSON 形式 へ変換した。
S3 へアップロード
下記のようなディレクトリ構造になるよう、画像ファイルと JSON ファイルを S3 へアップロードする。
s3://your_bucket/train/xxxx.jpg- トレーニング用画像ファイル
s3://your_bucket/train_annotation/xxxx.json- トレーニング用画像ファイルのアノテーション JSON
s3://your_bucket/validation/yyyy.jpg- 検証用画像ファイル
s3://your_bucket/validation_annotation/yyyy.json- 検証用画像ファイルのアノテーション JSON
マネジメントコンソールのアップロード画面へ適宜ファイルをドロップすれば済む。
トレーニング・デプロイ・推論
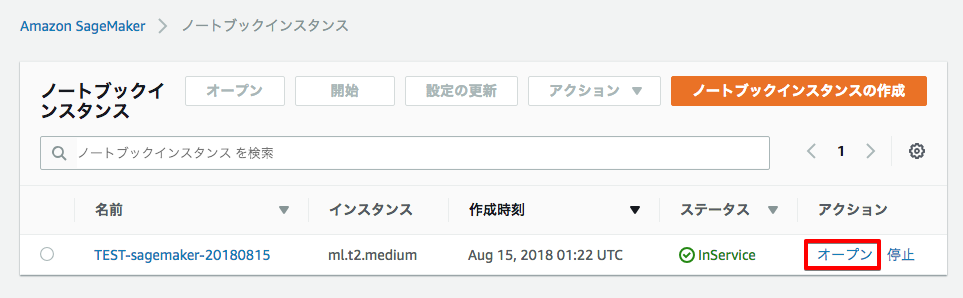
とりあえず、下記のリンクから Jupyter Notebook を開き、SageMaker Examples – object_detection_image_json_format.ipynb を Use。トレーニング用画像周りの処理 (Data Preparation のところ) などを変更して実行。

Setup
%%time
import sagemaker
from sagemaker import get_execution_role

role = get_execution_role()
print(role)
sess = sagemaker.Session()

bucket = '<your_s3_bucket_name_here>'
prefix = 'DEMO-ObjectDetection'

from sagemaker.amazon.amazon_estimator import get_image_uri

training_image = get_image_uri(sess.boto_region_name, 'object-detection', repo_version="latest")
print (training_image)
Prepare dataset
画像等は前項で S3 アップロード済み。
%%time

train_channel = prefix + '/train'
validation_channel = prefix + '/validation'
train_annotation_channel = prefix + '/train_annotation'
validation_annotation_channel = prefix + '/validation_annotation'

s3_train_data = 's3://{}/{}'.format(bucket, train_channel)
s3_validation_data = 's3://{}/{}'.format(bucket, validation_channel)
s3_train_annotation = 's3://{}/{}'.format(bucket, train_annotation_channel)
s3_validation_annotation = 's3://{}/{}'.format(bucket, validation_annotation_channel)

s3_output_location = 's3://{}/{}/output'.format(bucket, prefix)
Training
od_model = sagemaker.estimator.Estimator(training_image,
                                         role,
                                         train_instance_count=1,
                                         train_instance_type='ml.p3.2xlarge',
                                         train_volume_size = 50,
                                         train_max_run = 360000,
                                         input_mode = 'File',
                                         output_path=s3_output_location,
                                         sagemaker_session=sess
                                         )

#
# Object Detection Hyperparameters
# https://docs.aws.amazon.com/sagemaker/latest/dg/object-detection-api-config.html
#
od_model.set_hyperparameters(base_network='resnet-50',
                             use_pretrained_model=1,
                             num_classes=3, # 検出する物体の数
                             mini_batch_size=4, # なんかエラーが出てジョブが失敗する場合は減らすと良いらしい
                             epochs=50,
                             learning_rate=0.001,
                             lr_scheduler_step='10',
                             lr_scheduler_factor=0.1,
                             optimizer='sgd',
                             momentum=0.9,
                             weight_decay=0.0005,
                             overlap_threshold=0.5,
                             nms_threshold=0.45,
                             image_shape=512,
                             label_width=350,
                             num_training_samples=300 # トレーニング用画像数
                             )


train_data = sagemaker.session.s3_input(s3_train_data, distribution='FullyReplicated',
                        content_type='image/jpeg', s3_data_type='S3Prefix')
validation_data = sagemaker.session.s3_input(s3_validation_data, distribution='FullyReplicated',
                             content_type='image/jpeg', s3_data_type='S3Prefix')
train_annotation = sagemaker.session.s3_input(s3_train_annotation, distribution='FullyReplicated',
                             content_type='image/jpeg', s3_data_type='S3Prefix')
validation_annotation = sagemaker.session.s3_input(s3_validation_annotation, distribution='FullyReplicated',
                             content_type='image/jpeg', s3_data_type='S3Prefix')

data_channels = {'train': train_data, 'validation': validation_data,
                 'train_annotation': train_annotation, 'validation_annotation':validation_annotation}

# 10分とか、そういうオーダーで時間がかかる
od_model.fit(inputs=data_channels, logs=True)
Hosting
object_detector = od_model.deploy(initial_instance_count = 1,
                                 instance_type = 'ml.m4.xlarge')
Inference (推論)
お待ちかねの推論。
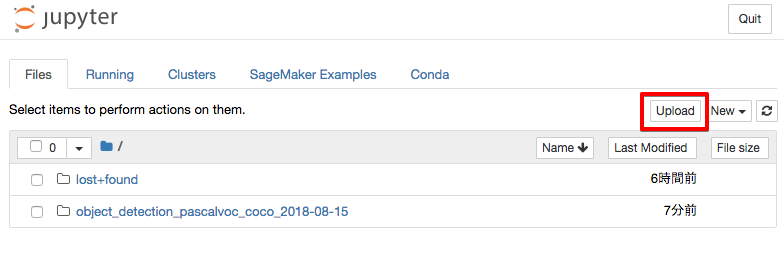
画像は下記のボタンからノートブックインスタンスへアップロードできる。
# Jupyter Notebook にアップロードした画像ファイル名
file_name = 'XXXX.jpg'

with open(file_name, 'rb') as image:
    f = image.read()
    b = bytearray(f)
    ne = open('n.txt','wb')
    ne.write(b)

import json

object_detector.content_type = 'image/jpeg'
results = object_detector.predict(b)
detections = json.loads(results)
print (detections)

def visualize_detection(img_file, dets, classes=[], thresh=0.6):
        """
        visualize detections in one image
        Parameters:
        ----------
        img : numpy.array
            image, in bgr format
        dets : numpy.array
            ssd detections, numpy.array([[id, score, x1, y1, x2, y2]...])
            each row is one object
        classes : tuple or list of str
            class names
        thresh : float
            score threshold
        """
        import random
        import matplotlib.pyplot as plt
        import matplotlib.image as mpimg

        img=mpimg.imread(img_file)
        plt.imshow(img)
        height = img.shape[0]
        width = img.shape[1]
        colors = dict()
        for det in dets['prediction']:
            (klass, score, x0, y0, x1, y1) = det
            if score < thresh:
                continue
            cls_id = int(klass)
            if cls_id not in colors:
                colors[cls_id] = (random.random(), random.random(), random.random())
            xmin = int(x0 * width)
            ymin = int(y0 * height)
            xmax = int(x1 * width)
            ymax = int(y1 * height)
            rect = plt.Rectangle((xmin, ymin), xmax - xmin,
                                 ymax - ymin, fill=False,
                                 edgecolor=colors[cls_id],
                                 linewidth=3.5)
            plt.gca().add_patch(rect)
            class_name = str(cls_id)
            if classes and len(classes) > cls_id:
                class_name = classes[cls_id]
            plt.gca().text(xmin, ymin - 2,
                            '{:s} {:.3f}'.format(class_name, score),
                            bbox=dict(facecolor=colors[cls_id], alpha=0.5),
                                    fontsize=12, color='white')
        plt.show()

object_categories = ['daicon', 'ganmodoki', 'shirataki']
threshold = 0.2

visualize_detection(file_name, detections, object_categories, threshold)
ここまで正常に実行できたら、冒頭の画像のような検出結果が可視化される。
後片付け
放置すると、1 エンドポイントで数百 USD / Month になるので、不要なエンドポイントは必ず削除。
sagemaker.Session().delete_endpoint(object_detector.endpoint)
※マネジメントコンソールからも削除可能
※不要なら、ノートブックインスタンスも同様に削除
まとめ
- 大根しか出ねぇ……
- とりあえずサンプルノートブックを模倣すれば、機械学習素人でもそれっぽいことができるのですごい
- ソフト・インフラ両面からの手厚いサポートにより、機械学習をコモディティ化を促進させてインフラで儲けようとする AWS の企みが
- 次を真面目にやればもっとマシになるはず
- Automatic Model Tuning
- トレーニング用画像を真面目に用意する、もっと増やす
- トレーニング用画像の水増しを真面目にやる